
Instalación cinturones de seguridad traseros de tres puntos en VW T3 (ingles)
Fuente: http://www.brickwerks.co.uk/index.php/rear-seatbelt-kit-t3.html


Starting point - VW T3 Westfalia California, note how the rear pillar trim over laps the lower trim panel.

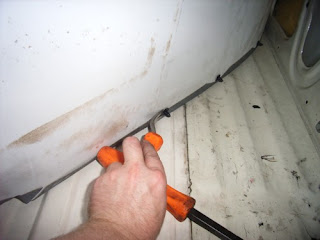
Drill out the factory pop rivets for the rear mosquito net to allow removal of trim panels.

Once you have taken the trims off, remove the shoulder loop mounting blanking screw from the mount with a #3 Philip's screwdriver.
From the lower trim panel, remove the panel clips that are adjacent to the lower belt mounting as they will no longer fit.

Fit the inertia reel as shown, take care to tighten the bolts fully, we use thread locking compound. Please also note the piece of card behind the retractor to stop bit of insulation getting jammed in the mechanism. Also worth mentioning is the angle of the belt... approx 7 degrees towards the rear.

Drape the belt over the trim panel, then use some packing to stop the trim clipping all the way back on, this will leave room for the belt to exit the panel and not get caught. From the factory there was a rectangular aperture cut from the panel and a plastic trim piece fitted but these are sadly now obsolete and this is the neatest solution.

Attach the shoulder loop to the body of the van as shown, use a wavy washer and a stepped spacer, and then another spacer to clear the interior trim, you will need to loosely fit the pillar trim first.

The lap mounting can be found tucked in the corner, under the seat. Seen here just below that "special" wiring.
Once you have fitted this mounting you can now remove the piece of foam that us used in manufacture to stop the belt retracting too far.

The mounting of the buckle end needs no further instruction, if you got this far we are sure you'll work it out!

Fitting the bolt cover to the shoulder loop.

Refit the lower trim over the upper one to leave a gap for the belt to exit.

All that is left is to re-rivet the mosquito net poppers back on.

A diagram of how VW did it, notice that our bracket is a single piece design, and not a 2 piece item like theirs, also note that we have removed the sharp internal angles between the welded brackets to strengthen them.
Fuente: http://www.brickwerks.co.uk/index.php/rear-seatbelt-kit-t3.html
VW T3 rear seat belt fitting guide.

Este enlace también os puede orientar: http://volksweb.relitech.com/helmut/RearSeatBelt/RSFB_001.HTM
Model numbers 251, 252 (Panel van/delivery van, left hand drive and right hand drive respectively) do not come with seat belt mountings from the factory. The bodywork where the belt mounts are meant to be situated is dimpled to help you locate the correct place to mount the strengthening plates needed to safely fit a seat belt. You should be aware though that different converters positioned the rear seat/bed at different heights and locations. These belts are designed to mount in the factory locations and work with seats in the factory positions. They do work with others, but you need to use a little common sense when mounting them, and consider where the belt is likely to seat in relation to the passenger
Model numbers 253, 254 (Combi – Empty delivery van but with windows)
Model numbers 255, 256 (Caravelle – upholstered cabin)
The above 4 models do come with factory fitted seat-belt mountings and will not require any drilling of metal work or the fitment of strengthening plates as VW have already made this provision for you.
The only drilling/cutting required with be of interior fixtures and fittings.
The only drilling/cutting required with be of interior fixtures and fittings.
Most Westfalia models are Combi (253) based, so they already have seat-belt mounts.
Most UK converted camper vans are Panel Van based, have no factory fitted side window or seat-belt mounts.
Below is a brief guide on how to fit a rear seat belt kit to a T3 Westfalia camper as this is the most popular application of the belt kits we sell. This guide will give you a decent understanding of how the belt fits in other models too.
IMPORTANT!! - The belts we previously sold (now obsolete) were fitted with a foam block to stop the belt retracting too far into the body and jamming the reel. The replacements dont come with this foam block. Dont let the belt retract into the belt too far, it will jam. We suggest folding the belt a few times and securing with a clothes peg or similar whilst fitting to prevent the belt retracting.
IMPORTANT!! - The belts we previously sold (now obsolete) were fitted with a foam block to stop the belt retracting too far into the body and jamming the reel. The replacements dont come with this foam block. Dont let the belt retract into the belt too far, it will jam. We suggest folding the belt a few times and securing with a clothes peg or similar whilst fitting to prevent the belt retracting.
Basically the belt is so long that the belt will retract to the point of the reel getting so thick that it will lock on the housing and they are a nightmare to undo!!
If it does retract, the belt can be teased out of the mechanism with a little patience, the belt MUST be at approximately 7 degrees towards the rear of the vehicle to do this, but with patience it will come out. Do not under any circumstances try to prise the housing open, or open the retractor mechanism in any way. Not only will this void any warranty on the belt, but could also upset the retractor mechanism making it unsafe to use.

Starting point - VW T3 Westfalia California, note how the rear pillar trim over laps the lower trim panel.

Drill out the factory pop rivets for the rear mosquito net to allow removal of trim panels.

Once you have taken the trims off, remove the shoulder loop mounting blanking screw from the mount with a #3 Philip's screwdriver.

From the lower trim panel, remove the panel clips that are adjacent to the lower belt mounting as they will no longer fit.

Fit the inertia reel as shown, take care to tighten the bolts fully, we use thread locking compound. Please also note the piece of card behind the retractor to stop bit of insulation getting jammed in the mechanism. Also worth mentioning is the angle of the belt... approx 7 degrees towards the rear.

Drape the belt over the trim panel, then use some packing to stop the trim clipping all the way back on, this will leave room for the belt to exit the panel and not get caught. From the factory there was a rectangular aperture cut from the panel and a plastic trim piece fitted but these are sadly now obsolete and this is the neatest solution.

Attach the shoulder loop to the body of the van as shown, use a wavy washer and a stepped spacer, and then another spacer to clear the interior trim, you will need to loosely fit the pillar trim first.

The lap mounting can be found tucked in the corner, under the seat. Seen here just below that "special" wiring.
Once you have fitted this mounting you can now remove the piece of foam that us used in manufacture to stop the belt retracting too far.

The mounting of the buckle end needs no further instruction, if you got this far we are sure you'll work it out!

Fitting the bolt cover to the shoulder loop.

Refit the lower trim over the upper one to leave a gap for the belt to exit.

All that is left is to re-rivet the mosquito net poppers back on.

A diagram of how VW did it, notice that our bracket is a single piece design, and not a 2 piece item like theirs, also note that we have removed the sharp internal angles between the welded brackets to strengthen them.
cinturón, cinturones, cinturón
Otros posts sobre cinturones de seguridad:


No hay comentarios:
Publicar un comentario
Gracias por visitar el Blog de Hippitifaldi, dime que opinas de este artículo. Comenta, pero con respeto, tu dirección IP queda registrada en el servidor. Tu comentario se pondrá una vez lo apruebe. Gracias!